

A used DSLR can feel like a steal until hidden wear turns the bargain into a money pit. A camera may look clean in photos, yet still have a tired shutter, hazy lens glass, sticky buttons, or wear that only shows up in your hands.
April 2026 is still a good time to buy used DSLR gear. Since many buyers moved to mirrorless, older DSLR bodies and lenses often sell 30 to 50 percent below their old new prices, and sometimes even less. That means beginners can often get better image quality, longer battery life, and a bigger used lens pool for less money.
A calm inspection beats buyer’s regret. Start with the seller, then check the body, verify shutter count, inspect the lens, and finish with test shots.
Start with the right deal, not just the lowest price
The best used camera deal is the one that holds up after a week, not the one that saved you $25. Returns, honest grading, and a short warranty often matter more than squeezing every last dollar out of the price.
In April 2026, beginner DSLR bodies still offer strong value in the US used market. These are typical body-only ranges:
| Model | Typical used price | Notes |
|---|---|---|
| Canon Rebel T6 | $150 to $250 | Cheapest entry point, older but usable |
| Canon Rebel T7 | $200 to $300 | Good starter Canon with 24MP sensor |
| Nikon D3500 | $250 to $350 | Excellent battery life, easy to use |
| Nikon D5600 | $300 to $450 | Better screen and features, still beginner-friendly |
That sweet spot exists because mirrorless now gets most of the attention. So, older DSLRs have become the used market’s quiet value pick.
Where beginners can buy with less risk
Camera stores and refurbished sellers usually cost a bit more, but they also test gear, grade condition, and offer returns. That safety net matters when you don’t yet know how a sticky dial feels or what lens haze looks like. Large used departments, such as Adorama Used, can be easier for first-time buyers because the listing language is usually clearer.
Peer-to-peer deals on eBay, Facebook Marketplace, Craigslist, and photo forums can save money. Still, the risk shifts to you. Local meetups work best because you can test everything before handing over cash.
How to read a listing before you message the seller
A solid listing shows the exact item from several angles. It should mention shutter count, cosmetic wear, battery and charger status, lens condition, and whether the camera saw professional work. If the seller only says “works great,” that isn’t enough.
Be careful with stock photos, giant accessory bundles, and vague phrases like “no time to test.” Those often hide the real condition. Also pay attention to the seller’s answers. If they dodge direct questions about shutter count, lens haze, or return policy, keep scrolling. A fair seller makes your job easier.
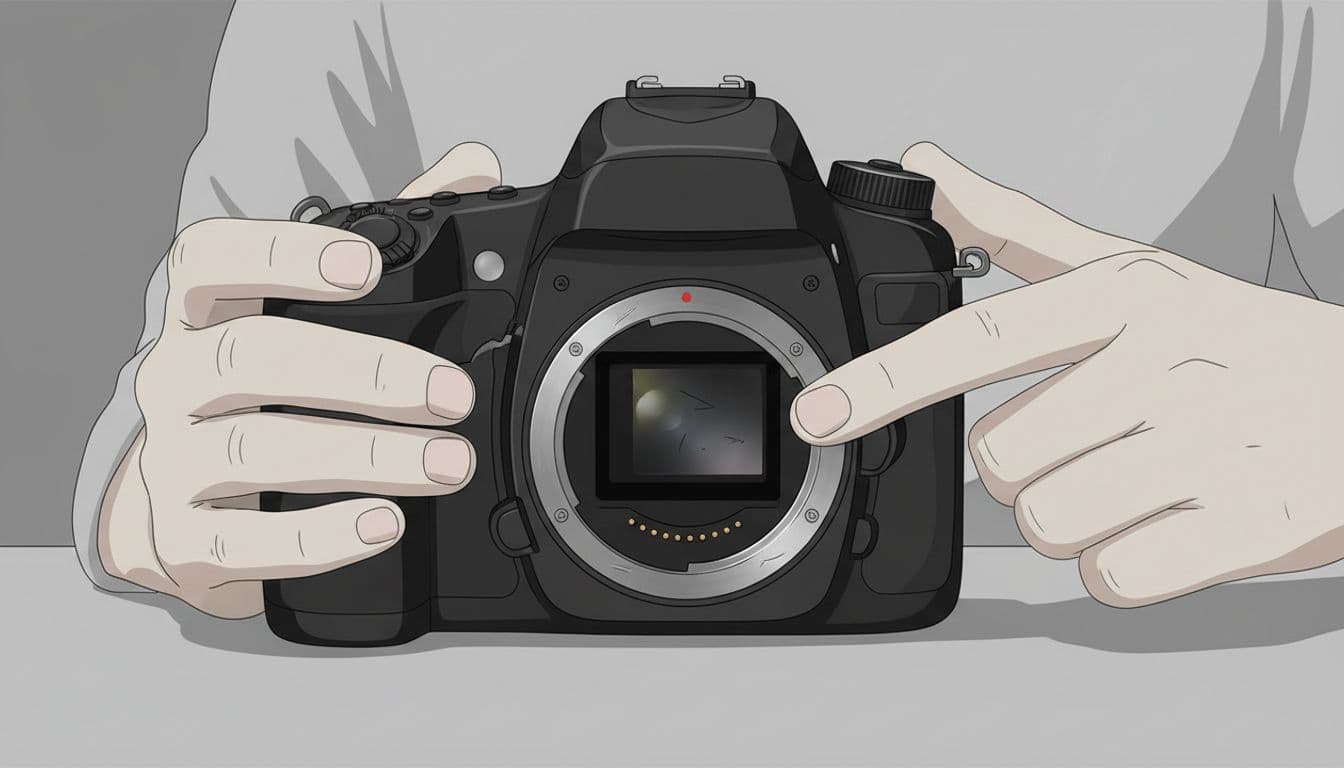
Check the camera body for wear you can feel and wear you can’t see
A DSLR body tells its story in small places. Start outside and move inward. Look at the grip rubber, strap lugs, battery door, hot shoe, side ports, tripod mount, card slot, and lens mount. Heavy brassing, rust on contacts, or wobble at the mount can point to hard use or moisture damage.
Grip rubber matters more than many beginners expect. If it is peeling, stretched, or loose, the camera may have spent years in heat, sweat, or rough bags. Check the tripod socket too. A scratched mount is normal. A mount that looks chewed up can mean constant tripod use, often in hard service.
Small signs that hint at a hard life
Corners tell the truth. So do polished edges, rubbed-off labels, and tiny dents near the prism or base plate. Those marks often show years of knocks, even if the front looks clean.
Look closely at screws. Uneven or stripped screws can mean the body was opened for repair or tampering. Dirt packed into seams, around buttons, or inside the hot shoe also matters. A camera can be wiped down for sale and still carry the fingerprints of rough use in the cracks.
Test every button, dial, door, and port before you trust the body
Now use the camera, don’t only admire it. Press every button. Spin every dial. Open every door. The shutter release should feel crisp, not mushy. Dials should move one step at a time, without skipping. Card and battery doors should latch firmly.
Check the LCD for dead pixels, flicker, or odd color patches. Plug a cable into the ports if you can, or at least inspect the covers for cracks and looseness. If several controls feel sticky, or the menu jumps around when you turn a dial, the body has earned your caution.
Understand shutter count so you don’t buy a body near the end of its life
Shutter count is the camera’s mileage. Each photo adds one more cycle to a moving part that will not last forever. For most beginners, under 50,000 clicks is a comfortable target. Once you cross 100,000, caution rises fast. A simple rule also helps: aim for fewer than about 10,000 shots per year of the camera’s age.
Treat shutter count like mileage on a car, not a full diagnosis.
A low count on a badly stored camera can still be a bad deal. On the other hand, a clean body with honest wear and a known history can be fine even if the count is higher than you’d prefer.
How to check shutter count on Canon, Nikon, and older Sony DSLR or SLT bodies
Ask the seller for a fresh JPEG taken that day. Then verify it yourself with a free shutter count checker. For Canon DSLRs, people often use EOS Utility or an EXIF upload tool. Nikon bodies usually reveal the count through EXIF readers or supported apps and menus. Older Sony DSLR or SLT models may require Imaging Edge support, a desktop tool, or the seller’s own screenshot.
Fresh files matter because screenshots can be old, cropped, or faked. If a seller won’t send a new image, assume there’s a reason.
When a high shutter count is still okay, and when to walk away
Sometimes a high count is priced in. A body with 80,000 clicks, clean controls, no mount wobble, and a fair price may still make sense for a first cheap setup. That works best if the savings leave room for a future repair or replacement.
Walk away when the bad signs pile up together. A high count plus sticky controls, loose doors, odd sensor marks, or heavy mount wear is usually a poor first purchase. Heavily used pro bodies can look tempting because the price seems low. Still, beginner buyers are often better off with a simpler body that lived an easier life.
Inspect lenses like you’re looking through a window at sunrise
Lenses hide trouble better than camera bodies. Start with the front and rear glass, then check the filter threads, zoom and focus rings, mount, and internal elements. Tiny cleaning marks on the front element may never show in photos. Haze, fungus, separation, or oily blades can cost you sharpness and money.
Normal dust inside a used lens is common. A few dry specks usually won’t affect images. Trouble begins when the glass looks foggy, webbed, greasy, or uneven.
How to spot lens haze, fungus, and internal damage with a flashlight
Shine a bright light through the lens at an angle and rotate it slowly. Haze looks like fog or a thin film. Fungus often appears as fine white threads, dots, or branch-like marks. Separation may show rainbow edges near the rim of an element. A musty smell is another warning.
If you want a visual reference before meeting a seller, this short lens haze vs fungus guide helps you tell the difference.
Minor dust is normal. Haze, fungus, and separation are repair words.
Also check the filter threads. Bent threads can signal a drop, even if the glass survived. Then inspect the rear mount for scratches, rust, or looseness.
Sticky aperture blades and stiff rings are bigger problems than they seem
Mount the lens on the camera, open it wide, then stop down to a small aperture such as f/16 in live view or by taking test shots. The blades should snap open and closed fast. Any lag, hesitation, or visible oil is bad news.
Turn the focus ring from end to end. It should move with even resistance. Zoom rings should feel smooth too. If the lens extends on its own when pointed downward, that is zoom creep. It isn’t always fatal, but it suggests wear. Wobble at the mount matters more, because it can affect focus and alignment.
Take a few test photos to catch the hidden wear photos won’t show
A quick shooting test reveals the problems that glossy listing photos miss. You don’t need a studio. A coffee shop wall, a bright sky, and one simple outdoor scene can tell you a lot.
The quick photo test for sensor dust, oil spots, and dead pixels
Set the lens to f/16 or f/22 and photograph a plain wall or bright sky. Then zoom in to 100 percent. Fixed dark spots often mean sensor dust. Greasy or smeared marks may point to oil splatter.
Minor dust may only need a cleaning. Heavy oil can mean a repair bill, especially if the shutter or mirror box is shedding residue.
Use one simple scene to test focus, sharpness, and exposure
Shoot the same scene at a few apertures and shutter speeds. Then inspect the files for missed focus, soft corners, uneven blur, dark bands, and strange exposure jumps. One soft corner can hint at a damaged element or lens decentering.
If you want a good refresher on what to check before buying, these used lens inspection tips from KEH are worth a quick read. The big goal is simple: confirm that the camera and lens behave the same way from shot to shot. Consistency is what you are buying.
A beginner does not need a perfect camera. You need an honest one.
Choose a trustworthy seller, inspect the body, verify shutter count, check the lens for haze and sticky parts, then take test shots. If the gear is clean, priced fairly, and free of major hidden wear, small flaws don’t ruin the deal. They simply become part of a used camera’s story.